My fam damily

My fam damily

Monday, December 16, 2013

Herb roasted turkey

This was my first turkey EVER!  I was so nervous but it turned out perfect, so moist & not dry at all!  It had wonderful flavor too :)  I will definitely make this again!

12 lb whole turkey (Mine was 20 I just had to cook a little longer)
1/2 cup olive oil
1/2 cup butter, melted
2 tbsp garlic powder
2 tsp dried basil
1 tsp poultry seasoning
1 tsp salt
1/2 tsp black pepper
2 cups chicken broth or stock

Directions:
1.  Preheat oven  to 325 degrees.  Clean turkey (discard giblets and organs), and place in roasting pan with a lid.  (I did mine in a roaster)

2.  In a small bowl, combine olive oil, melted butter, and seasonings.  Using a basting brush, apply the mixture to the outside of the uncooked turkey.  Poor chicken broth in the bottom of the roasting pan and cover.  (I also injected mine with the mixture)

3.  Bake for 3 to 3 1/2 hours or until the internal temp of the thickest part of the thigh measures 180 degrees F.  Remove bird from oven and allow to stand for about 30 minutes before carving.  (Since I had an extra 8 lbs on my turkey, I cooked an extra hour and just kept checking the temp til it hit 180)

I found the original recipe on allrecipes.com but after reading reviews, changed it a little to my liking.

Monday, December 2, 2013

Turkey Veggie Tray

 Found this cute idea on Pinterest!  This was an easy project, cutting up the veggies was really the hardest part lol.  And it's a fun project for the kiddos to help out with!  Mine got a kick out of it!

Here's what we used:
1 bag celery
2 bags of the cut up broccoli & cauliflower
1 bag mini carrots
1 red bell pepper
1 green bell pepper
1 yellow bell pepper
2 cucumbers
1 cheese ball

For the face I just used pieces of an olive for the eyes, and a red bell pepper for the head, and the yellow bell pepper for the beak.  
I also put some ranch on the side for those that prefer that over the cheese ball and a bowl of olives on the side too :)

Double Layer Pumpkin Cheesecake


This was my first year having Thanksgiving at my house.  I was a bit nervous about the whole thing, what if the turkey was dry?  What if I didn't make enough food for everyone?  Or burned something?  But I am so proud of myself because everything turned out amazing!

I had never made a cheese cake.  Or a pumpkin pie.  Or home made pie crust.  BUT I did all of that in this one delicious recipe (Well, 2 actually.  Crust and the pie).  Every body loved it!  It is definitely a keeper and the pie crust was awesome!  

I found both recipes on www.allrecipes.com :)

Double Layer Pumpkin Cheesecake:
2 (8 oz) packages cream cheese, softened
1/2 cup white sugar
1/2 tsp vanilla extract
2 eggs
1 (9 inch) prepared graham cracker crust
1/2 cup pumpkin puree
1/2 tsp ground cinnamon
1 pinch ground cloves
1 pinch ground nutmeg
1/2 cup frozen whipped topping, thawed

Directions:
1.  Preheat oven to 325 degrees F
2.  In a large bowl, combine cream cheese, sugar and vanilla.  Beat until smooth.  Blend in eggs one at a time.  Remove 1 cup of batter and spread into bottom of crust; set aside.
3.  Add pumpkin, cinnamon, cloves, and nutmeg to the remaining batter and stir gently until well blended.  Carefully spread over the batter in the crust.
4.  Bake in preheated oven for 35-40 minutes or until center is almost set.  Allow to cool, then refrigerate for 3 hours or overnight.  Cover with whipped topping before serving.


Pie crust:
1 1/2 cups finely ground graham cracker crumbs
1/3 cup white sugar
6 tbsp butter, melted
1/2 tsp ground cinnamon 

Directions:
1.  Mix graham cracker crumbs, sugar, melted butter or margarine, and cinnamon until well blended.  Press mixture into an 8 or 9 inch pie plate.
2.  Bake at 375 degrees F for 7 minutes.  Cool.  If the recipe calls for unbaked pie shell, just chill for one hour.  

Tuesday, November 19, 2013

Jambalaya

My husband and I love cajun food!  I found this recipe a few years ago on www.allrecipes.com and was so glad I did!  You can easily double this recipe, which I always do when I make it because it goes so fast!

Ingredients:
1 tbsp olive oil
1/2 lb smoked sausage (or andouille if you can find it, we can't this far north!), cut into 1/4 inch thick slices
1 large onion, chopped
1 cup chopped green bell pepper
1 cup chopped celery
salt to taste
1/2 tsp cajun seasoning, or to taste
1 cup uncooked white rice
1 (14.5 oz) can diced tomatoes with juice
1 tbsp minced garlic
2 cups chicken broth
3 bay leaves
1/4 tsp dried thyme leaves
1 lb peeled and deveined medium shrimp (30-40 per lb)

Directions:
1.  Heat the olive oil in a dutch oven or large pot over medium heat.  Stir in the sausage, and cook for 2 minutes.  Add the onion, bell pepper, and celery; season with salt and cajun seasoning.  Cook and stir until the vegetable are soft, 6-8 minutes.
2.  Stir in the rice until evenly coated in the veggie mixture, then pour in the tomatoes with juice, garlic, chicken broth, bay leaves, and thyme leaves.  Bring to a simmer over medium-high heat, then reduce to medium-low, cover and simmer for 20 minutes.
3.  After 20 minutes, stir in the shrimp and cook 10 minutes uncovered until the shrimp turn pink and are no longer translucent in the center.
4.  Remove the pot from the heat and let stand 5 minutes.  Discard the bay leaves before serving.

Makes 8 servings.


Thursday, November 14, 2013

Christmas Card Ideas

Here are a few of my favorites from last year that we used on our Christmas card!


Tuesday, November 12, 2013

Baked Ham & Cheese on King's Hawaiian Rolls


This is a favorite in my house!  It makes a delicious and easy lunch or dinner, and is great for picky little eaters!  The King's Hawaiian sweet rolls add great flavor and are a fun twist to the traditional grilled ham & cheese sandwich.  

All you need is:

1 pkg King's Hawaiian rolls
1/2 lb cheese of choice (cheddar, provolone and swiss are all yummy and popular choices), you can adjust to your preference of cheesiness.  I didn't use the entire amount for mine.
1/2 lb sliced deli ham or turkey (I did a mix of both)

Bake at 350 degrees for 10-15 minutes 

Enjoy!


Crock Pot Apple Crisp


Ingredients


4-6 apples cored, sliced and peeled (optional)
1/2 cup butter, melted
1 cup brown sugar
1 cup quick oats
1/2 cup flour
3/4 cup water
1/2 cup sugar
1 tsp cinnamon
1/4 cup chopped pecans (optional)

Instructions

1.  Spray the inside of the crock pot and put the apples inside.
2.  In a medium bowl, put the melted butter, mix in the oats, flour, sugars, cinnamon, pecans and water.
3.  Spoon mixture over the apples.
4.  Cook on low for 3-4 hours.
5.  Serve warm and enjoy!


I found this recipe here:  http://myroyalkitchen.com/2013/10/crockpot-apple-crisp/

Monday, November 11, 2013

Monday Humor :)


I hope everyone survived their Monday!

Sunday, November 10, 2013

Wonton taco bites


I made these for a football party and they were sooooo good!  And easy!

All you need is:

1 package of the won ton wrappers
1 lb of hamburger (I used 1.5)
1 package seasoning
1-2 cups of cheese, depending on how cheesy you like em

Step 1:  Cook 1 lb ground beef, season with taco seasoning.
Step 2:  Use non-stick spray on muffin tin and place wonton wrappers in tin.
Step 3:  Fill uncooked wontons with beef, top with shredded cheese.
Step 4:  Bake at 350 degrees for 8 minutes.

Enjoy!

I found this great recipe here:  http://www.flickr.com/photos/ginnerobot/3431227193

Tuesday, November 5, 2013

Saturday, November 2, 2013

Creamy Crock Pot Chicken

This is delish!  I served this wrapped in tortilla, you could also put it over rice.

For this delicious meal you will need:
3 lbs chicken breast
1 can black beans (rinsed and drained!)
1 package cream cheese (do not use fat free)
1 can rotel original
1 can corn (drained)

It is so easy, just put the chicken in then put everything else on top, cook on low for 6 hours, shred with a fork and dinner is ready!

This makes a LOT!  My family of four each had one stuffed burrito and we all could have easily had another if we wanted.  But we were full after the first lol, it is very filling :)


I know, the crock pot liner doesn't make for very pretty pictures, but it sure does make clean up so easy!


Friday, November 1, 2013

Child art wall display :)


This was so easy to do!

I just found the saying on amazon, for a great price!  And then used the wire that you use on the back of picture frames.  I got 2 packs for less than $2 each at Hobby Lobby and they came with the little screws and just wrapped the wire around those.

And then I just use clothes to hang up the art work :)


E-A-T Wooden Letters DIY

I found these HUGE letters at Hobby Lobby.  
I've wanted to make these for soooo long and have a kitchen where I could use them.
So here is what you need:

Wooden letters
2 different colors of paint.  
Candles just the clear white kind
Sandpaper


It was actually really easy.  Just paint the letters with your base color.  I chose a light blue.
Wait for it to dry.
Once dry, rub the letters with the candle.  I used the long skinny kind.  This just helps protect the base paint so when you start sanding it doesn't rub away that color too.
Then paint your top color.  Let dry.
Once dry, start sanding.  This is to however your liking for that aged/worn look.  I think I went a little sanding happy and over did it a little lol.  You can do just the edges or an all over like I did.  That part is all up to you!


Fun and easy!  Now I need to come up with more words to do he he!

What do you think?

Thursday, October 31, 2013

Ventriloquist doll costume


I thought this was a fun idea and it was creepy without all the gore. 

My hair was a lot more ratted out and wild in the beginning of the evening but flattened down a bit by the time I got home and took this pic. Still, overall I am really pleased with how it turned out :) 

The makeup is actually really easy, the hardest part for me was getting the contacts in because I don't normally wear contacts lol.

What do you think? What would you do different? 

Baby shower diaper cake


My first diaper cake.
I feel pretty proud of myself :)
You can buy the head band and tutu at hobby lobby in a kit, so I didn't really come up with this creation on my own, I just followed the instructions lol.
But still.  Go me! Haha.
BUT, now I know the basics to make one for next time :D

Monday, October 28, 2013

Trick or treat footprint craft

I saw this idea on Pinterest and thought it was a cute Halloween craft :) Eli is so ticklish, it was hard to paint his feet lol.


Going out hair


We went to Vegas in May and it was hot.  I was trying to find a way to keep my hair off my neck but still look dressed up.  This was a pretty easy solution.
I just curled my hair using my flat iron, then pinned it all to one side.  Simple :)

Sunday, October 27, 2013

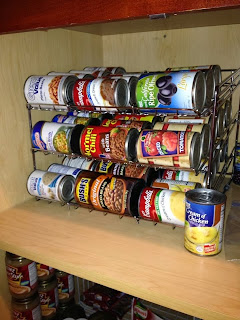
Canned food Organization


I'm kind of a food hoarder.  
If I'm shopping for ingredients for a meal, I will usually buy double so that I will have some extra on hand for next time I want to make that meal.  It's a great idea as long as you buy the ingredients that don't expire right away, but it also fills up the pantry fast!

I found this solution on amazon.com, you can purchase it here:


What do you do to keep your pantry organized?

Saturday, October 26, 2013

Rolled up jeans and skull top :)


Please pay no attention to the messy room.  Or the crappy mirror selfie haha.  Just notice that dang cute outfit!  I got the top on sale at Deb, and the jeans at Vanity.  The belt I picked up from a vendor at the Sturgis Biker Rally.  I think the heels are from tillys.com?  

My hair


I love this look.  Having the blonde underneath makes it so easy to manage and don't have to worry about embarrassing dark roots.  And when I do my hair curly it makes it more noticeable than when it's just straight.

Friday, October 25, 2013

Monthly photos collage


It's done!
Monthly photos for a year, and here is the result.
It is rather bittersweet.
I look at these and it blows my mind how fast the year went.
He changed into a little man so quick!
I really love this.  I can't wait to get it printed on framed on the wall :)

Hand print fish


This was our attempt at hand print fish.  Eli was not even a year yet so getting him to allow his hand to go flat was tough!  And I got some of his arm in the paint lol, so I guess those are eels?  Haha.  Daddy still appreciated it of course :)  I think I want to try this one again when he's a little older and do different colors or something, maybe to look like angel fish?

My Big One Year Old!

So here is the result of my little mini photo session I did of my little man!

 I found these letters on amazon.com, you can find them here: http://www.amazon.com/Kids-Line-White-Wooden-Letter/dp/B000XPS9C8/ref=sr_1_1?ie=UTF8&qid=1382712182&sr=8-1&keywords=white+wooden+letters

And I just dressed him up cute, sat him on a chair and handed him each letter and snapped away!  I used picmonkey.com to edit the pics and make the collage :)  I love love how it turned out!!  What do you all think?

Sunday, October 6, 2013

Halloween decorations are up!

Well, most of it lol.  I still have spider webs to put up and the outside is not decorated yet.

I just received my console table for the entry way and put it together yesterday and I love it!  It's so fun to finally have areas to decorate for each holiday!  You can get it here: http://www.seventhavenue.com/janikka-console.pro?omSource=SLI& :)


My wall in the dining area is still very bare, I might hang a big spider web there.  But for now I am pretty happy with how this looks!


I have never had a staircase I could decorate, it is so much fun!  Maybe now I'll have a Halloween party!  We used to have one every year and it's been a few years since we have, now we have plenty of room!  Too bad we don't know very many people here though.

Monday, April 22, 2013

Eli's Rock Star Nursery :)

It took me MONTHS to finally decide how I wanted to do Eli's room.  I looked everywhere for ideas and finally just started looking on etsy for bedding and that's when I decided on this theme :)  My sister and I painted the walls a light blue on 2 walls and a light gray on the other 2, which the combo turned out so great!  I actually need to update some of these pics so you can see the entire finished product now that we have a glider and rug down in there.

I found this cute ruler on amazon.com!  You can find it here: http://www.amazon.com/gp/product/B0058SIQXW/ref=oh_details_o05_s00_i00?ie=UTF8&psc=1  
This bedding was custom made and I love love love it!!  I think finding bedding that I liked was the hardest part, we knew we wanted something skull print and do a rock star type nursery but we didn't want it to be scary either.  I think this fits the theme perfectly and it's perfect for a baby boy's room :)  You can check out the seller and all her wonderful items here:  http://www.etsy.com/shop/SweetDreamsBedding?ref=pr_shop_more

It took me FOREVER to find something to put above Eli's crib and finding something that both Bo and I agreed on!  I found this and searched everywhere for the best price and finally found it on ebay!

My husband's cousin made us this adorable frame!  It now has a picture in it, I really need to update these pics lol :)
   
I love etsy!  That is where I found a lot of great stuff for Eli :)  Love this Boppy cover, check out the seller and all her wonderful custom made items here: http://www.etsy.com/shop/MommysLittleRockStar?ref=seller_info
Eli loves the soft minky material on his blanket and I just love the overall look and quality of the bedding!  The crib has  held up well for us, even with my older 2 being silly and climbing in it lol.  I found the crib on cribs.com, their prices were the most reasonable I could find but the shipping did take a really long time, I had to contact them a few times about it.  They did respond quickly, I think the crib was actually backordered and it just didn't state that on the website.  Here is the link to their site: http://www.cribs.com/cribs/sleigh-cribs/kalaniiicribset.cfm

Another look at Eli's adorable bedding :)

My friend Samantha made this for us!!  I love it!  We have it hanging below the window right by the glider :)  I will post some newer pics soon I promise!

Sunday, April 21, 2013

Fruit Crepes Yummm!


I stumbled upon these crepes in the produce section at my grocery store and I can't get enough of them!  They make a delicious breakfast or lunch!

The actual crepe is only 51 calories, the brand is called Melissa's.  
The crepe with the fruit and whipped cream is less than 250 calories, makes for a healthy meal!

I sliced up one banana and a couple strawberries, then topped it with redi whip.  I've made these a couple of times and I've also put blueberries and blackberries in it.  I seriously can't get bored of these :)

Au Gratin Sausage Skillet


My hubby and kids love it when I fix this!  I found this recipe in the cook book Fast Fixes with Mixes.  You can find it on amazon, check it out!

1 lb fully cooked kielbasa or polish sausage, halved and sliced 1/2 inch thick
2 tbps vegetable oil
1 package au gratin potatoes
2 1/2 cups water
1 package (8 oz) frozen california mix veggies
1-2 cups shredded cheddar cheese

1.  In a skillet, cook sausage in oil until lightly browned.  Drain.
2.  Add potatoes with contents of sauce mix and water.  Cover and cook over medium heat for 18-20 minutes or until the potatoes are almost tender, stirring occasionally.
3.  Add veggies, cover and cook for 8-10 minutes or until potatoes and veggies are tender.
4.  Sprinkle with cheese.  Remove from the heat; cover and let stand for 2 minutes until the cheese is melted.

YIELD: 4 servings

NOTE:  The milk and butter listed on the potato package are not used in this recipe.

Tuesday, March 26, 2013

Easter Wreath!


Check it out!  I'm pretty proud of myself, I was able to start AND finish this during just one of Eli's naps :)  After making the Christmas deco mesh wreath this one was easy since I already knew what I was doing.  I got all my supplies at Hobby Lobby, loves the speckled eggs!!  

I didn't take pictures step by step but youtube has some great tutorials if you just search for deco mesh wreaths :)